 码恋
码恋
ALL YOUR SMILES, ALL MY LIFE.
Netty 系列笔记之源码分析:发送数据

一、引言
接着上一篇,数据在 pipline 中处理完成后,往往需要给予客户端一定的响应,这个阶段就是本篇的主要内容:发送数据。
二、Netty 写数据的三种方式
| 快递场景(包裹) | Netty 写数据(数据) |
|---|---|
| 揽收到仓库 | write : 写到一个 buffer |
| 从仓库发货 | flush : 把 buffer 中的数据发送出去 |
| 揽收到仓库并立即发货(加急件) | writeAndFlush : 写到 buffer 立即发送 |
| 揽收与发货之间有中转仓库 | write 和 flush 之间有个 ChannelOutBoundBuffer |
三、Netty 写数据要点
- 写不进数据时,会停止写操作,并注册 OP_WRITE 事件,等待通知可以写了再继续写。
- 批量写数据时,如果想写的都写成功了,接下来会尝试些更多数据,可以通过调整 maxBytePerGatheringWrite 限制写数据的最值大小。
- Netty 只要有数据可写,就会一直尝试,直到写不出去或者已经达到 16 次,可通过调整 writeSpinCount 实现。
- Netty 待写数据太多时,超过一定的水位线(
WriteBufferWaterMark.high()),会将可写的标志位改为 false ,让应用端自己做决定要不要继续发送数据了。
四、Netty 写数据过程一览
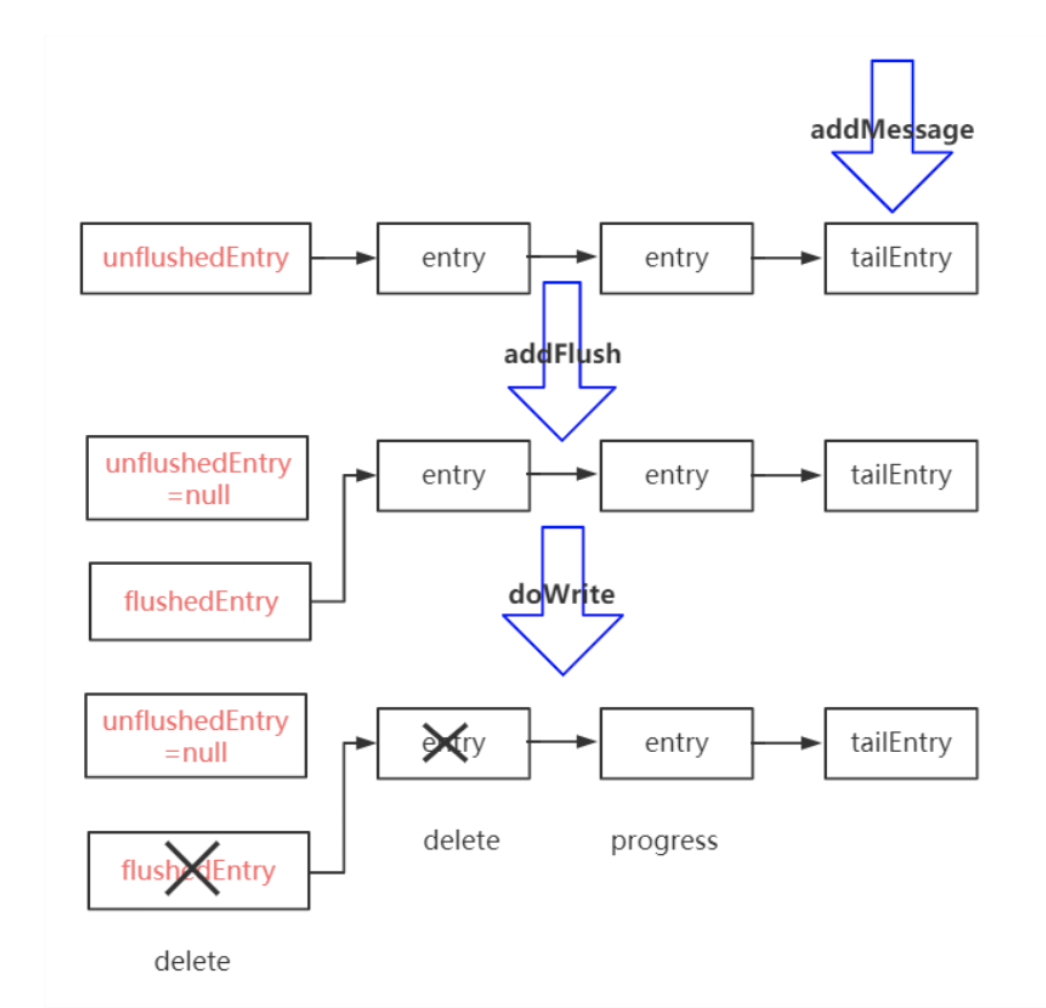
写数据分为两个部分:
-
write:
将数据写到 Buffer ,调用ChannelOutboundBuffer#addMessage()方法将消息放到待写队列中的队尾,形成链表结构。 -
flush:
发送 Buffer 里面的数据,调用AbstractChannel.AbstractUnsafe#flush()- 准备数据:
ChannelOutboundBuffer#addFlush(),将队首的 unflushedEntry 赋值为 null ,将对发送的数据 entry 赋值给 flushedEntry 。 - 发送:
NioSocketChannel#dowrite(),将已经发送的 entry 删除,如果数据发送了一半,则使用 progress 标记发送的位置。
- 准备数据:
五、Netty 发送数据过程源码分析
我们继续以 netty-example 模块下的 EchoServer 为例,分析 Netty 发送数据的过程。
这里 EchoServer 的例子做的是,客户端不断的发送递增的数字给服务端,服务端接收后再反向发送给客户端,所以我们从 EchoServerHandler#channelRead() 方法入手,看服务端如何发送数据。
1、write 部分
在 channelRead() 方法中调用了 AbstractChannelHandlerContext#invokeWrite() :
private void invokeWrite0(Object msg, ChannelPromise promise) {
        try {
            ((ChannelOutboundHandler) handler()).write(this, msg, promise);
        } catch (Throwable t) {
            notifyOutboundHandlerException(t, promise);
        }
    }
实际到后面是调用了 AbstractChannel 的 AbstractUnsafe#write() 方法:
public final void write(Object msg, ChannelPromise promise) {
            assertEventLoop();

            ChannelOutboundBuffer outboundBuffer = this.outboundBuffer;
            if (outboundBuffer == null) {
                // If the outboundBuffer is null we know the channel was closed and so
                // need to fail the future right away. If it is not null the handling of the rest
                // will be done in flush0()
                // See https://github.com/netty/netty/issues/2362
                safeSetFailure(promise, newClosedChannelException(initialCloseCause, "write(Object, ChannelPromise)"));
                // release message now to prevent resource-leak
                ReferenceCountUtil.release(msg);
                return;
            }

            int size;
            try {
                msg = filterOutboundMessage(msg);
                size = pipeline.estimatorHandle().size(msg);
                if (size < 0) {
                    size = 0;
                }
            } catch (Throwable t) {
                safeSetFailure(promise, t);
                ReferenceCountUtil.release(msg);
                return;
            }

            outboundBuffer.addMessage(msg, size, promise);
        }
在方法的 第 4 行 我们看到了发送数据的缓冲仓库真身 ChannelOutboundBuffer 。接下来的判空是用来判断 channel 是否已经关闭了,如果关闭则执行安全关闭的逻辑。
接下来的 16 到 27 行 大概计算一下消息的大小,然后就调用 outboundBuffer.addMessage(msg, size, promise) 方法将消息放入缓冲 buffer 中。
public void addMessage(Object msg, int size, ChannelPromise promise) {
        Entry entry = Entry.newInstance(msg, size, total(msg), promise);
        if (tailEntry == null) {
            flushedEntry = null;
        } else {
            Entry tail = tailEntry;
            tail.next = entry;
        }
        // 追加到队尾
        tailEntry = entry;
        // 如果没数据队尾就是 unflushedEntry
        if (unflushedEntry == null) {
            unflushedEntry = entry;
        }

        // increment pending bytes after adding message to the unflushed arrays.
        // See https://github.com/netty/netty/issues/1619
        incrementPendingOutboundBytes(entry.pendingSize, false);
    }
上述方法的逻辑就如上面的写数据过程图的 write 部分所示,将消息包装为 Entry 然后追加到队尾。在方法的最后有一行
incrementPendingOutboundBytes(entry.pendingSize, false);
private void incrementPendingOutboundBytes(long size, boolean invokeLater) {
        if (size == 0) {
            return;
        }
        // 根据之前的计算出的数据大小,更新 buffer 中还有多少数据没有处理完毕
        long newWriteBufferSize = TOTAL_PENDING_SIZE_UPDATER.addAndGet(this, size);
        // 判断待发送数据是否已经超过了高水位线
        if (newWriteBufferSize > channel.config().getWriteBufferHighWaterMark()) {
            // 如果超过,则将状态变为不可写
            setUnwritable(invokeLater);
        }
    }
这个方法用来判断待发送的数据是否已经超出给定的最高水位线,如果超出则将状态变为不可写,让用户决定是否继续写。
执行到这里,Netty 发送数据的 write 部分就执行完毕了。
2、flush 部分
回到 EchoServerHandler:
@Sharable
public class EchoServerHandler extends ChannelInboundHandlerAdapter {

    @Override
    public void channelRead(ChannelHandlerContext ctx, Object msg) {
        ctx.write(msg);
    }

    @Override
    public void channelReadComplete(ChannelHandlerContext ctx) {
        ctx.flush();
    }

    @Override
    public void exceptionCaught(ChannelHandlerContext ctx, Throwable cause) {
        // Close the connection when an exception is raised.
        cause.printStackTrace();
        ctx.close();
    }
}
在客户端发送过来的数据处理完毕后,执行了 flush() 方法,我们继续跟进。
-
数据准备
AbstractChannelHandlerContext#flush():public ChannelHandlerContext flush() { final AbstractChannelHandlerContext next = findContextOutbound(MASK_FLUSH); EventExecutor executor = next.executor(); if (executor.inEventLoop()) { next.invokeFlush(); } else { Tasks tasks = next.invokeTasks; if (tasks == null) { next.invokeTasks = tasks = new Tasks(next); } safeExecute(executor, tasks.invokeFlushTask, channel().voidPromise(), null, false); } return this; }继续执行 invokeFlush() :
private void invokeFlush0() {
      try {
          ((ChannelOutboundHandler) handler()).flush(this);
      } catch (Throwable t) {
          invokeExceptionCaught(t);
      }
  }
后面实际调用了
AbstractChannel的AbstractUnsafe#flush()方法:public final void flush() { assertEventLoop(); ChannelOutboundBuffer outboundBuffer = this.outboundBuffer; if (outboundBuffer == null) { return; } outboundBuffer.addFlush(); flush0(); }在 第 9 行 我们看到了 addFlush() 方法,即数据准备。(下一行就是数据发送,我们下面讲。)
public void addFlush() {
      // There is no need to process all entries if there was already a flush before and no new messages
      // where added in the meantime.
      //
      // See https://github.com/netty/netty/issues/2577
      Entry entry = unflushedEntry;
      if (entry != null) {
          if (flushedEntry == null) {
              // there is no flushedEntry yet, so start with the entry
              flushedEntry = entry;
          }
          do {
              flushed ++;
              if (!entry.promise.setUncancellable()) {
                  // Was cancelled so make sure we free up memory and notify about the freed bytes
                  int pending = entry.cancel();
                  decrementPendingOutboundBytes(pending, false, true);
              }
              entry = entry.next;
          } while (entry != null);

          // All flushed so reset unflushedEntry
          unflushedEntry = null;
      }
  }
这个方法也和我们开头的过程图对应,即将 unflushedEntry 的数据放到 flushedEntry 中。
-
发送
数据准备完毕后,就到了发送阶段了:protected void flush0() { if (inFlush0) { // Avoid re-entrance return; } final ChannelOutboundBuffer outboundBuffer = this.outboundBuffer; if (outboundBuffer == null || outboundBuffer.isEmpty()) { return; } inFlush0 = true; // Mark all pending write requests as failure if the channel is inactive. if (!isActive()) { try { // Check if we need to generate the exception at all. if (!outboundBuffer.isEmpty()) { if (isOpen()) { outboundBuffer.failFlushed(new NotYetConnectedException(), true); } else { // Do not trigger channelWritabilityChanged because the channel is closed already. outboundBuffer.failFlushed(newClosedChannelException(initialCloseCause, "flush0()"), false); } } } finally { inFlush0 = false; } return; } try { doWrite(outboundBuffer); } catch (Throwable t) { if (t instanceof IOException && config().isAutoClose()) { /** * Just call {@link #close(ChannelPromise, Throwable, boolean)} here which will take care of * failing all flushed messages and also ensure the actual close of the underlying transport * will happen before the promises are notified. * * This is needed as otherwise {@link #isActive()} , {@link #isOpen()} and {@link #isWritable()} * may still return {@code true} even if the channel should be closed as result of the exception. */ initialCloseCause = t; close(voidPromise(), t, newClosedChannelException(t, "flush0()"), false); } else { try { shutdownOutput(voidPromise(), t); } catch (Throwable t2) { initialCloseCause = t; close(voidPromise(), t2, newClosedChannelException(t, "flush0()"), false); } } } finally { inFlush0 = false; } }虽然方法的行数很多,但是逻辑比较简单,在 第 33 行 一眼就看到了关键代码,
doWrite()方法,真正执行发送数据的部分。这里我们是 server 端为例,所以直接来到
NioSocketChannel#doWrite()方法:protected void doWrite(ChannelOutboundBuffer in) throws Exception { SocketChannel ch = javaChannel(); // 有数据要写,且能写入,最多尝试 16 次 int writeSpinCount = config().getWriteSpinCount(); do { if (in.isEmpty()) { // All written so clear OP_WRITE // 数据全部写完,不需要尝试 16 次 clearOpWrite(); // Directly return here so incompleteWrite(...) is not called. return; } // Ensure the pending writes are made of ByteBufs only. // 尽量多写数据 int maxBytesPerGatheringWrite = ((NioSocketChannelConfig) config).getMaxBytesPerGatheringWrite(); // 数据组装为 ByteBuffer 数组,最多返回 1024,不超过 maxBytesPerGatheringWrite ByteBuffer[] nioBuffers = in.nioBuffers(1024, maxBytesPerGatheringWrite); int nioBufferCnt = in.nioBufferCount(); // Always use nioBuffers() to workaround data-corruption. // See https://github.com/netty/netty/issues/2761 switch (nioBufferCnt) { case 0: // We have something else beside ByteBuffers to write so fallback to normal writes. writeSpinCount -= doWrite0(in); break; case 1: { // 单个数据直接调用 channel.write(buffer) 方法 // Only one ByteBuf so use non-gathering write // Zero length buffers are not added to nioBuffers by ChannelOutboundBuffer, so there is no need // to check if the total size of all the buffers is non-zero. ByteBuffer buffer = nioBuffers[0]; int attemptedBytes = buffer.remaining(); final int localWrittenBytes = ch.write(buffer); if (localWrittenBytes <= 0) { incompleteWrite(true); return; } adjustMaxBytesPerGatheringWrite(attemptedBytes, localWrittenBytes, maxBytesPerGatheringWrite); // 移除已经写完的数据 in.removeBytes(localWrittenBytes); --writeSpinCount; break; } default: { // 批量写,调用 channel.write(nioBuffers, 0, nioBufferCnt) // Zero length buffers are not added to nioBuffers by ChannelOutboundBuffer, so there is no need // to check if the total size of all the buffers is non-zero. // We limit the max amount to int above so cast is safe long attemptedBytes = in.nioBufferSize(); final long localWrittenBytes = ch.write(nioBuffers, 0, nioBufferCnt); if (localWrittenBytes <= 0) { incompleteWrite(true); return; } // Casting to int is safe because we limit the total amount of data in the nioBuffers to int above. adjustMaxBytesPerGatheringWrite((int) attemptedBytes, (int) localWrittenBytes, maxBytesPerGatheringWrite); in.removeBytes(localWrittenBytes); --writeSpinCount; break; } } } while (writeSpinCount > 0); // 写了 16 次还是没写完,直接交给 eventLoop 去执行写,而不是注册 OP_WRITE 事件。 incompleteWrite(writeSpinCount < 0); }其中根据数据的不同,分为单个数据和批量写两种逻辑,对比之下只是最后调用的 JDK 的 write 方法不同,我们以单个数据为例说明。
首先获得最多尝试的次数,默认最多尝试 16 次。然后判断数据如果全部写完,则终止循环。接着计算最多写数据的大小,并组装为 ByteBuffer 数组。之后就是两种数据分类的不同处理方式,单个数据时直接调用 JDK 的 channel.write(buffer) 方法写出数据,然后移除已经发送的数据,并标记数据发送的位置。
值得注意的是在方法的最后,如果写了 16 次数据还是没有写完,那么直接将写任务交给 EventLoop 去执行。
六、知识点
1、写数据的本质是调用 JDK 的 SocketChannel#write() 方法
- Single write
sun.nio.ch.SocketChannelImpl#write(ByteBuffer src) - Gathering write
sun.nio.ch.SocketChannelImpl#write(ByteBuffer[] srcs, int offset, int length)
2、写数据写不进去时会停止写,注册一个 OP_WRITE 事件,来通知什么时候可以写进去了。
3、OP_WRITE 不是说有数据可写,而是可以写进去,所以正常情况不能注册,会一直触发。
4、批量写数据时,如果尝试写的都写进去了,接下来会尝试写更多。
5、只要有数据写,则会一直尝试,直到 16 次。如果写了 16 次还没有写完,则直接包装成 Task 交给线程去执行,而不是注册写事件来触发。
6、待写数据太多,超过水位线时,会将写状态设置为不可写,交给应用程序判断是否继续写。

- 一、引言
- 二、Netty 写数据的三种方式
- 三、Netty 写数据要点
- 四、Netty 写数据过程一览
- 五、Netty 发送数据过程源码分析
- 1、write 部分
- 2、flush 部分
- 六、知识点
- 1、写数据的本质是调用 JDK 的 SocketChannel#write() 方法
- 2、写数据写不进去时会停止写,注册一个 OP_WRITE 事件,来通知什么时候可以写进去了。
- 3、OP_WRITE 不是说有数据可写,而是可以写进去,所以正常情况不能注册,会一直触发。
- 4、批量写数据时,如果尝试写的都写进去了,接下来会尝试写更多。
- 5、只要有数据写,则会一直尝试,直到 16 次。如果写了 16 次还没有写完,则直接包装成 Task 交给线程去执行,而不是注册写事件来触发。
- 6、待写数据太多,超过水位线时,会将写状态设置为不可写,交给应用程序判断是否继续写。