 码恋
码恋
ALL YOUR SMILES, ALL MY LIFE.
Netty 系列笔记之源码分析:创建连接

一、引言
上一篇我们分析了启动服务的过程,服务启动重要的一件事就是最后注册了一个 OP_ACCEPT 事件。接下来就等待着新的连接进来,所以这一篇就介绍 Netty 如何处理创建连接的过程。
二、Netty 创建连接过程一览
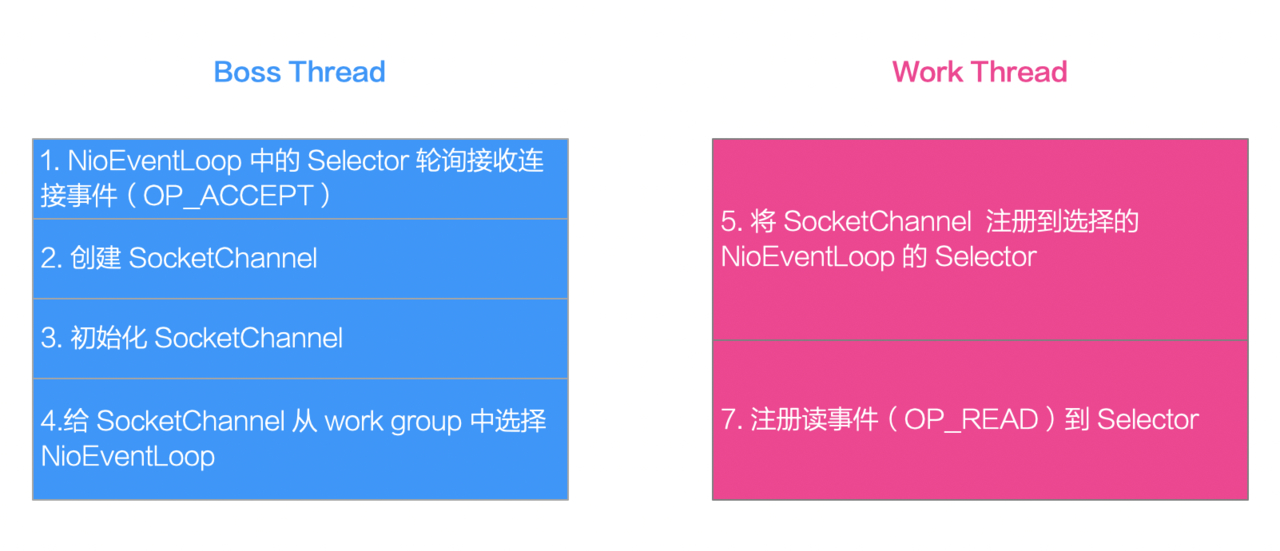
BossGroup 的 NioEventLoop 持有的 Selector 在启动的过程中注册了 OP_ACCEPT 事件,之后轮询连接接受事件,等待连接的到来。一旦有 OP_ACCEPT 事件发生(即有新连接到来),首先需要创建 SocketChannel 并初始化,然后将注册 SocketChannel 到 Selector 上的操作交给 WorkGroup 的 NioEventLoop。
再由 WorkGroup 的 NioEventLoop 执行,然后再注册读事件 (OP_READ)到 Selector 就完成了连接的创建。
三、Netty 创建连接源码分析
1、轮询 OP_ACCEPT 事件
在 Netty 的启动过程中,将 OP_ACCEPT 事件注册到了 NioEventLoop 持有的 Selector 上面,创建连接的开始在于 Selector 轮询 OP_ACCEPT 事件。其逻辑在 NioEventLoop#run() 方法中:
@Override
    protected void run() {
        // 用于记录 select 的次数
        int selectCnt = 0;
        for (;;) {
            try {
                // select 的策略
                int strategy;
                try {
                    // 用于选择 select 的策略:默认实现为有任务时,调用 selectNow() 返回新增的 IO 就绪事件的数量;没任务时使用阻塞策略。
                    strategy = selectStrategy.calculateStrategy(selectNowSupplier, hasTasks());
                    switch (strategy) {
                        //重试策略,默认实现下不存在这个情况
                    case SelectStrategy.CONTINUE:
                        continue;
                        // 繁忙等待,NIO 目前不支持
                    case SelectStrategy.BUSY_WAIT:
                        // fall-through to SELECT since the busy-wait is not supported with NIO
                        // 阻塞策略
                    case SelectStrategy.SELECT:
                        // 上一个任务运行的截止时间
                        long curDeadlineNanos = nextScheduledTaskDeadlineNanos();
                        if (curDeadlineNanos == -1L) {
                            curDeadlineNanos = NONE; // nothing on the calendar
                        }
                        // 设置下一个唤醒时间
                        nextWakeupNanos.set(curDeadlineNanos);
                        try {
                            // 现在没有任务
                            if (!hasTasks()) {
                                // 执行 select
                                strategy = select(curDeadlineNanos);
                            }
                        } finally {
                            // This update is just to help block unnecessary selector wakeups
                            // so use of lazySet is ok (no race condition)
                            nextWakeupNanos.lazySet(AWAKE);
                        }
                        // fall through
                    default:
                    }
                } catch (IOException e) {
                    // If we receive an IOException here its because the Selector is messed up. Let's rebuild
                    // the selector and retry. https://github.com/netty/netty/issues/8566
                    rebuildSelector0();
                    selectCnt = 0;
                    handleLoopException(e);
                    continue;
                }
                // select 轮询成功数量 + 1
                selectCnt++;
                cancelledKeys = 0;
                needsToSelectAgain = false;
                final int ioRatio = this.ioRatio;
                boolean ranTasks;
                // ioRatio 配置为 100 时,不考虑时间占比的分配
                if (ioRatio == 100) {
                    try {
                        // 如果当前有感兴趣的就绪 IO 事件
                        if (strategy > 0) {
                            // 处理
                            processSelectedKeys();
                        }
                    } finally {
                        // 运行所有的普通任务和定时任务,不限制事件
                        // Ensure we always run tasks.
                        ranTasks = runAllTasks();
                    }
                } else if (strategy > 0) {
                    // 任务的开始时间
                    final long ioStartTime = System.nanoTime();
                    try {
                        // 处理感兴趣的就绪 IO 事件
                        processSelectedKeys();
                    } finally {
                        // 运行所有任务,限制时间
                        // Ensure we always run tasks.
                        final long ioTime = System.nanoTime() - ioStartTime;
                        // 根据配置的比例算出执行任务的时间
                        ranTasks = runAllTasks(ioTime * (100 - ioRatio) / ioRatio);
                    }
                } else {
                    ranTasks = runAllTasks(0); // This will run the minimum number of tasks
                }

                if (ranTasks || strategy > 0) {
                    if (selectCnt > MIN_PREMATURE_SELECTOR_RETURNS && logger.isDebugEnabled()) {
                        logger.debug("Selector.select() returned prematurely {} times in a row for Selector {}.",
                                selectCnt - 1, selector);
                    }
                    selectCnt = 0;
                } else if (unexpectedSelectorWakeup(selectCnt)) { // Unexpected wakeup (unusual case)
                    selectCnt = 0;
                }
            } catch (CancelledKeyException e) {
                // Harmless exception - log anyway
                if (logger.isDebugEnabled()) {
                    logger.debug(CancelledKeyException.class.getSimpleName() + " raised by a Selector {} - JDK bug?",
                            selector, e);
                }
            } catch (Throwable t) {
                handleLoopException(t);
            }
            // Always handle shutdown even if the loop processing threw an exception.
            try {
                if (isShuttingDown()) {
                    closeAll();
                    if (confirmShutdown()) {
                        return;
                    }
                }
            } catch (Throwable t) {
                handleLoopException(t);
            }
        }
    }
NioEventLoop 的 run() 方法是一个死循环,首先获取 select 的策略,当 select 的策略为阻塞时,执行 select 获取当前感兴趣的就绪 IO 事件数量。如果有感兴趣的就绪 IO 事件,就调用 processSelectedKeys() 事件处理,然后根据配置的任务执行事件占比参数 ioRatio 执行全部的任务。
private void processSelectedKeys() {
        if (selectedKeys != null) {
            // 不使用 JDK 的 Selector.selectedKeys() ,性能更好,垃圾回收少
            processSelectedKeysOptimized();
        } else {
            processSelectedKeysPlain(selector.selectedKeys());
        }
    }
接下来看 processSelectedKeysOptimized() 方法:
private void processSelectedKeysOptimized() {
        for (int i = 0; i < selectedKeys.size; ++i) {
            final SelectionKey k = selectedKeys.keys[i];
            // null out entry in the array to allow to have it GC'ed once the Channel close
            // See https://github.com/netty/netty/issues/2363
            selectedKeys.keys[i] = null;

            final Object a = k.attachment();

            if (a instanceof AbstractNioChannel) {
                // 调用方法处理 IO 事件
                processSelectedKey(k, (AbstractNioChannel) a);
            } else {
                // NioTask 处理,可通过实现 NioTask 自定义处理事件的就绪
                @SuppressWarnings("unchecked")
                NioTask<SelectableChannel> task = (NioTask<SelectableChannel>) a;
                processSelectedKey(k, task);
            }

            if (needsToSelectAgain) {
                // null out entries in the array to allow to have it GC'ed once the Channel close
                // See https://github.com/netty/netty/issues/2363
                selectedKeys.reset(i + 1);

                selectAgain();
                i = -1;
            }
        }
    }
方法的逻辑比较简单,循环每个 SelectionKey ,获得其持有的 Channel,然后调用 processSelectedKey() 方法处理:
private void processSelectedKey(SelectionKey k, AbstractNioChannel ch) {
        // 如果 Channel  不合法则关闭
        final AbstractNioChannel.NioUnsafe unsafe = ch.unsafe();
        if (!k.isValid()) {
            final EventLoop eventLoop;
            try {
                eventLoop = ch.eventLoop();
            } catch (Throwable ignored) {
                // If the channel implementation throws an exception because there is no event loop, we ignore this
                // because we are only trying to determine if ch is registered to this event loop and thus has authority
                // to close ch.
                return;
            }
            // Only close ch if ch is still registered to this EventLoop. ch could have deregistered from the event loop
            // and thus the SelectionKey could be cancelled as part of the deregistration process, but the channel is
            // still healthy and should not be closed.
            // See https://github.com/netty/netty/issues/5125
            if (eventLoop == this) {
                // close the channel if the key is not valid anymore
                unsafe.close(unsafe.voidPromise());
            }
            return;
        }

        try {
            // 获取就绪的 IO 事件状态码
            int readyOps = k.readyOps();
            // We first need to call finishConnect() before try to trigger a read(...) or write(...) as otherwise
            // the NIO JDK channel implementation may throw a NotYetConnectedException.
            // OP_CONNECT 事件
            if ((readyOps & SelectionKey.OP_CONNECT) != 0) {
                // remove OP_CONNECT as otherwise Selector.select(..) will always return without blocking
                // See https://github.com/netty/netty/issues/924
                int ops = k.interestOps();
                ops &= ~SelectionKey.OP_CONNECT;
                k.interestOps(ops);
                // 完成连接
                unsafe.finishConnect();
            }
            // OP_WRITE 事件
            // Process OP_WRITE first as we may be able to write some queued buffers and so free memory.
            if ((readyOps & SelectionKey.OP_WRITE) != 0) {
                // Call forceFlush which will also take care of clear the OP_WRITE once there is nothing left to write
                // 向 Channel 中写入数据
                ch.unsafe().forceFlush();
            }
            // 读事件,包括 OP_READ 和 OP_ACCEPT
            // Also check for readOps of 0 to workaround possible JDK bug which may otherwise lead
            // to a spin loop
            if ((readyOps & (SelectionKey.OP_READ | SelectionKey.OP_ACCEPT)) != 0 || readyOps == 0) {
                unsafe.read();
            }
        } catch (CancelledKeyException ignored) {
            unsafe.close(unsafe.voidPromise());
        }
    }
2、接收连接、创建 SocketChannel 并初始化
针对不同的事件处理,这里我们关注 OP_ACCEPT 事件,其处理调用了 unsafe.read() ,针对不同的 Channel 有不同的实现,由于我们从服务端的视角来看待,故以 NioServerSocketChannel 的父类 AbstractNioMessageChannel 为例,其 read() 方法中调用了 doReadMessage() 处理:
@Override
    protected int doReadMessages(List<Object> buf) throws Exception {
        // 接受新连接并创建 SocketChannel
        SocketChannel ch = SocketUtils.accept(javaChannel());

        try {
            if (ch != null) {
                buf.add(new NioSocketChannel(this, ch));
                return 1;
            }
        } catch (Throwable t) {
            logger.warn("Failed to create a new channel from an accepted socket.", t);

            try {
                ch.close();
            } catch (Throwable t2) {
                logger.warn("Failed to close a socket.", t2);
            }
        }

        return 0;
    }
继续看下 SocketUtils.accept(javaChannel()):
public static SocketChannel accept(final ServerSocketChannel serverSocketChannel) throws IOException {
        try {
            return AccessController.doPrivileged(new PrivilegedExceptionAction<SocketChannel>() {
                @Override
                public SocketChannel run() throws IOException {
                    return serverSocketChannel.accept();
                }
            });
        } catch (PrivilegedActionException e) {
            throw (IOException) e.getCause();
        }
    }
这里,就出现了最后的大 BOSS :调用 JDK 的 serverSocketChannel.accept(); 接收新连接并创建 SocketChannel 并进行初始化,这就完成了上面过程图的第 2、3 步。
3、SocketChannel 注册到 Selector
调用 doReadMessage() 方法连接创建完毕后,继续执行下面的逻辑。
AbstractNioMessageChannel#read() 部分代码:
try {
                try {
                    do {
                        // 处理,对于 NioServerSocketChannel 来说是接收连接
                        int localRead = doReadMessages(readBuf);
                        if (localRead == 0) {
                            break;
                        }
                        if (localRead < 0) {
                            closed = true;
                            break;
                        }

                        allocHandle.incMessagesRead(localRead);
                    } while (allocHandle.continueReading()); // 判断是否继续读,autoRead/读到的 Byte 数等
                } catch (Throwable t) {
                    exception = t;
                }

                int size = readBuf.size();
                for (int i = 0; i < size; i ++) {
                    readPending = false;
                    // 创建连接的结果传递给 Pipline 处理
                    pipeline.fireChannelRead(readBuf.get(i));
                }
在连接创建完毕后,将结果传递给了 Pipline 继续处理,对于接收连接来说,其对应的 Handler 是 ServerBootstrapAcceptor ,其实现在 ServerBootstrap 中,我们直接看他的 channelRead() 方法:
@Override
        @SuppressWarnings("unchecked")
        public void channelRead(ChannelHandlerContext ctx, Object msg) {
            final Channel child = (Channel) msg;

            child.pipeline().addLast(childHandler);

            setChannelOptions(child, childOptions, logger);
            setAttributes(child, childAttrs);

            try {
                // 注册
                childGroup.register(child).addListener(new ChannelFutureListener() {
                    @Override
                    public void operationComplete(ChannelFuture future) throws Exception {
                        if (!future.isSuccess()) {
                            forceClose(child, future.cause());
                        }
                    }
                });
            } catch (Throwable t) {
                forceClose(child, t);
            }
        }
这里,熟悉的配方,又到了 Channel 的注册,其逻辑和前一篇的启动过程执行的代码是一样的,简单说就是 : 判断当前线程是否是 NioEventLoop 的自己的线程,如果是调用 JDK 的方法注册,否则将注册方法包装为一个任务交给 NioEventLoop 去执行。
然后再交给 Pipline 注册读事件 (OP_READ)到 Selector ,就完成了连接的创建过程。
详见 《Netty 系列笔记之源码分析:创建连接》 AbstractChannel 的 register() 方法分析,这里不再赘述。